Chat Box

Thursday, April 23, 2009

To generate Megaupload [MU] premium links (for Firefox)

To generate Megaupload [MU] premium links (for Firefox)
found this on this site:
Code:
https://addons.mozilla.org/en-US/firefox/addon/11051
you might want to install this add-on (no waiting time & auto-download) for making it easier too:
Code:
http://www.warez-bb.org/viewtopic.php?t=2281301


TO GENERATE MEGAUPLOAD.COM PREMIUM LINKS:
- install Flashget 1.73
Code:
http://www.brothersoft.com/flashget-74217.html
- install Flashgot Firefox Plugin
Code:
https://addons.mozilla.org/en-US/firefox/addon/220
- turn off and on Mozilla Firefox (to finish install Flashgot and connect with Flashget)
- make Flashget configuration: Tools --> Options -->Connection --> Max simultaneous jobs = 1
(1) open in FF browser Megaupload link
- write captha and press ENTER
- download with Flashgot
- choose SAVE TO location
- be sure, have u got enough HDD space
- press OK to download
- wait until program will reserve place on HDD
- PAUSE LINK after download 50KB
- GENERATE NEXT LINKS --> REPEAT (1)

After generate all links run all jobs (select all links and click green play button)


PS: i think it does the same as Jdownloader, just search for it in google

Sunday, March 15, 2009

STDU Viewer Ver 1.5

STDU Viewer box
Are you tired from many viewers one for each document?
Do you want to have, one program for all your technical documentations, scientific books and so on?
Do you want to have program, which fast opens files, fast loads pages and fast renders page to screen?
And all of this in free software?


markView all most popular documents formats by one program.

STDU Viewer is a document viewer for multiple file formats. The goal of this software is to replace the multiple document viewers with a single simple application. STDU Viewer supports TXT, TIFF, PDF and DjVu documents format. This is most popular formats for scientific and technical documentation.

markUse content for quick jumping from one section to another.

STDU Viewer gives the possibility to show the content of documents for quick jumping from one section to another.

markCreate your own bookmarks for quick access to part of documents

You can create your own named bookmarks for easy access to part of document.

markSTDU Viewer free for non-commercial uses.

Yes. You can use this program without any fees.


Download STDU Viewer (1.5 MB)

Saturday, March 7, 2009

Logic Works 5


Download Link:
http://ifile.it/0v3z8us

Saturday, February 21, 2009

MASM Syntax Highlighting In Visual Studio

MASM syntax highlighting in Visual Studio

When a text editor uses syntax highlighting, language keywords, strings, and other elements appear in different colors. Visual Studio and Visual C++ Express can highlight MASM reserved words and strings, as shown in the following example:

This won't happen automatically, but you can create a syntax definition file named Usertype.dat that contains MASM keywords. Then when Visual Studio (or Visual C++ Express) starts, it reads the syntax file and highlights MASM keywords.

Here are the required steps to set up MASM syntax highlighting in Visual Studio or Visual C++ Express:

1) Download the Usertype.dat file given here to a folder in which you have read/write permissions. If you are using Windows Vista, download to My Documents, or C:\temp, or any folder that doesn't have security restrictions.

2) Copy Usertype.dat to the C:\Program Files\Microsoft Visual Studio 9.0\Common7\IDE folder. If you are using Windows Vista, it will display a verification window before copying the file.

3) Open Visual Studio or Visual C++ Express, select Options from the Tools menu, select Text Editor, and select File Extension. On the right side of the dialog (shown below), enter asm as the extension, select Microsoft Visual C++ from the Editor list, and click the Add button. Click the OK button to save your changes.

Close Visual Studio and restart it. Open your project and display an ASM file. You should see syntax highlighting in the editor.

How To Use Visual Studio For Running Assembly Code

You might be interested to know more about how Visual C++ projects are set up for assembly language programs. Follow the following steps to use .Net Framework to assemble your assembly code. First of all install VS 2005 or VS 2008 complete and extract the content of irvine.exe
Download Irvine.exe for VS 2005
Download Irvine.exe for VS 2008

Now open Visual Studio and choose File -> New -> Project .

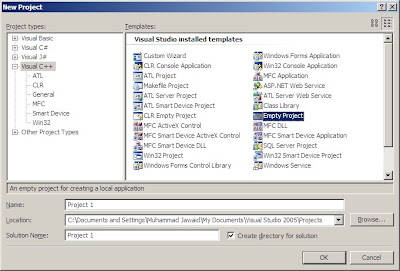
Select Visual C++ in left column and Empty Project in Right Column. Give a name to your project i.e. "Project 1" and click OK.

Right Click on the project in Solution Explorer and Choose "Custom Build Rules". or open it from Project menu i.e . Project -> Custom Build Rules


Int that Dialog Box mark "Microsoft Macro Assembler" as checked. and click OK


Now open Add New Item dialog box by right clicking in the solution explorer and choosing Add -> New Item.. Or you can also open Add New Item dialog box from toolbar button.
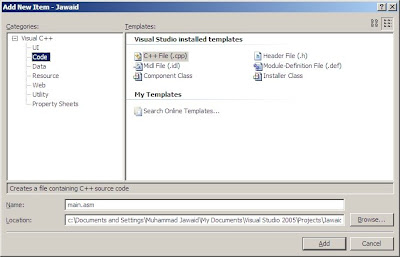
In Add New Item dialog box choose Code from left column and C++ File(.cpp) from right column. and give it any name with .asm extension. Like i have given it a name main.asm. Remember .asm extension is necessary.


Now select Project Properties from the Project menu. Expand the entry under Configuration Properties. Then expand the entry named Microsoft Macro Assembler. This is what you should see:
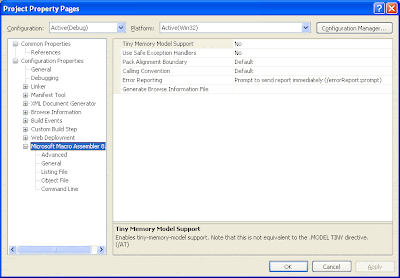
Click the entry named General under Microsoft Macro Assembler . Notice that the Include Paths option has been set to the c:\Irvine directory. This tells the assembler where to find files having a filename extension of ".inc". Here is a sample:

Find the Linker entry under Configuration Properties. Select the Input entry, and notice that two filenames have been added to the Additional Dependencies entry. The user32.lib file is a standard MS-Windows file. The irvine32.lib file is the link library file supplied with this book. There must be at least one space separating the file names:

Next, select Linker under Configuration Properties, and then select General. The Additional Library Directories option equals c:\Irvine, so the linker can find the Irvine32.lib library file:

Select Linker under the Configuration Properties and select Debugging. Notice that the Generate Debug Info option is set to Yes:

Select System under the Linker entry. Notice that the SubSystem option has been set to Console:

We use the Console setting because it is easy for assembly language programs to write output to a text console (Command) window. This is the window you see when running cmd.exe from the Start > Run menu in Windows.

Click the OK button to close the Project Property Pages window.


Now you have set up correctly so do start coding but remember to write the first line of code as

INCLUDE irvine32.inc