Download Irvine.exe for VS 2005
Download Irvine.exe for VS 2008
Now open Visual Studio and choose File -> New -> Project .
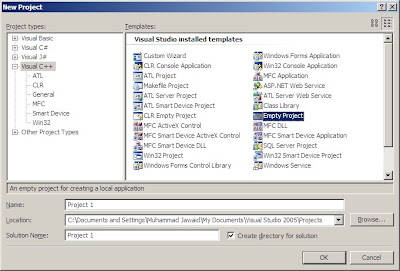
Select Visual C++ in left column and Empty Project in Right Column. Give a name to your project i.e. "Project 1" and click OK.
Right Click on the project in Solution Explorer and Choose "Custom Build Rules". or open it from Project menu i.e . Project -> Custom Build Rules
Int that Dialog Box mark "Microsoft Macro Assembler" as checked. and click OK
Now open Add New Item dialog box by right clicking in the solution explorer and choosing Add -> New Item.. Or you can also open Add New Item dialog box from toolbar button.
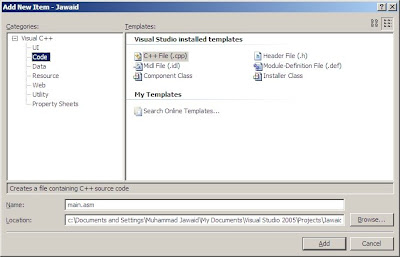
In Add New Item dialog box choose Code from left column and C++ File(.cpp) from right column. and give it any name with .asm extension. Like i have given it a name main.asm. Remember .asm extension is necessary.
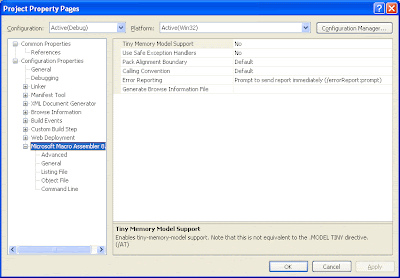
Now select Project Properties from the Project menu. Expand the entry under Configuration Properties. Then expand the entry named Microsoft Macro Assembler. This is what you should see:
Click the entry named General under Microsoft Macro Assembler . Notice that the Include Paths option has been set to the c:\Irvine directory. This tells the assembler where to find files having a filename extension of ".inc". Here is a sample:
Find the Linker entry under Configuration Properties. Select the Input entry, and notice that two filenames have been added to the Additional Dependencies entry. The user32.lib file is a standard MS-Windows file. The irvine32.lib file is the link library file supplied with this book. There must be at least one space separating the file names:Next, select Linker under Configuration Properties, and then select General. The Additional Library Directories option equals c:\Irvine, so the linker can find the Irvine32.lib library file:
Select Linker under the Configuration Properties and select Debugging. Notice that the Generate Debug Info option is set to Yes:
Select System under the Linker entry. Notice that the SubSystem option has been set to Console:
We use the Console setting because it is easy for assembly language programs to write output to a text console (Command) window. This is the window you see when running cmd.exe from the Start > Run menu in Windows.
Click the OK button to close the Project Property Pages window.
Now you have set up correctly so do start coding but remember to write the first line of code as
INCLUDE irvine32.inc


3 comments:
Not working to me!
One step is missing, also c:\Irvine in your main.asm
100% working
Thanks
Hi, well be sensible, well-all described
Post a Comment